
Desserts
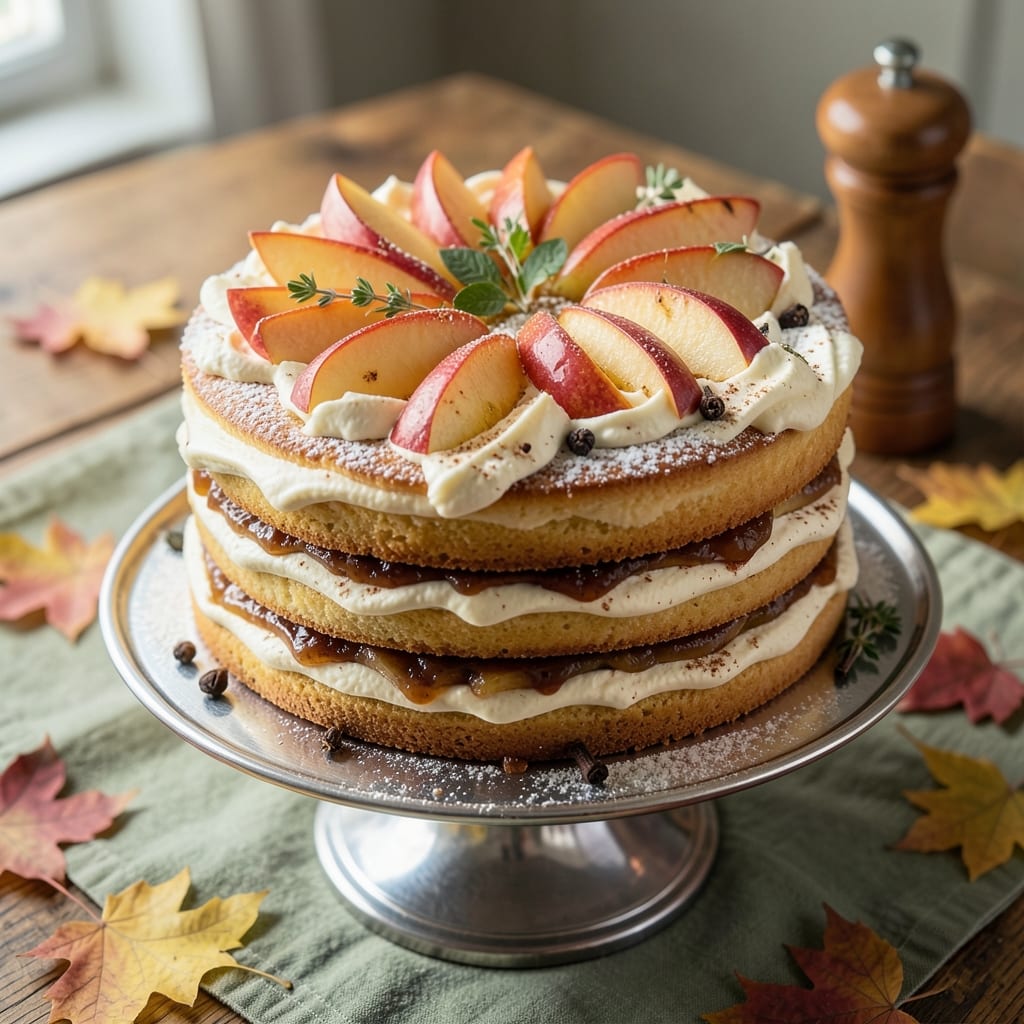
This apple crown cake recipe transforms humble apples into a showstopping dessert that looks as impressive as it tastes. 🍏 The secret lies in layers of spiced apple filling sandwiched between tender cake, all crowned with a buttery streusel that caramelizes to golden perfection. I developed this recipe after years of perfecting the balance between moist cake and jammy apple filling—no soggy layers here.
The cake itself is a delicate vanilla sponge, designed to hold up to generous fillings without crumbling. What sets this apart is the apple filling: a mix of tenderized apples, warm cinnamon, and a touch of lemon juice that keeps the filling bright and flavorful. The buttery streusel topping isn't just decoration—it adds a satisfying crunch that contrasts beautifully with the soft cake layers.
When baked to golden perfection, each slice reveals layers of spiced apple peeking through the streusel, creating a visual and textural experience that's pure comfort. The cake stays moist for days, making it perfect for gatherings or special occasions. Whether you're a seasoned baker or just starting out, this recipe delivers restaurant-quality results with simple techniques.
Ready to elevate your dessert game? This cake builds confidence with its foolproof assembly and foolproof baking instructions. Let's get started—your kitchen will smell like autumn in minutes.
Ingredients for apple crown cake
Eight servings of autumn in every bite—this cake needs just 14 ingredients for showstopping layers.
| Ingredient | Amount | Notes |
|---|---|---|
| All-Purpose Flour 🌾 | 3 cups | Sifted for light texture |
| Granulated Sugar 🍚 | 2 cups | White or light brown |
| Unsalted Butter 🧈 | 1 ½ cups | Room temperature, cubed |
| Large Eggs 🥚 | 4 whole | Room temperature |
| Vanilla Extract 🌸 | 2 tsp | Pure vanilla preferred |
| Baking Powder 🍞 | 2 tsp | Aluminum-free preferred |
| Ground Cinnamon 🌿 | 1 ½ tsp | Freshly ground preferred |
| Salt 🧂 | ½ tsp | Fine sea salt |
| Apples 🍎 | 6 medium | Honeycrisp or Granny Smith |
| Lemon Juice 🍋 | 2 tbsp | Freshly squeezed |
| Brown Sugar 🍚 | 1 cup | Packed firmly |
| Old-Fashioned Oats 🌾 | 1 ½ cups | Rolled, not quick |
| Chopped Walnuts 🥜 | ½ cup | Toasted for depth |
| Powdered Sugar 🍚 | ¼ cup | For dusting |
The apples are non-negotiable—Honeycrisp or Granny Smith give that perfect balance of sweet and tart. Local farmers markets often have the best selection, but any grocery store produce section works. Look for firm apples without bruises. I like to peel and core them myself (takes 10 minutes), but pre-sliced packages at Trader Joe's save time. The cinnamon in the cake and filling? Penzeys brand is my go-to for that warm, authentic spice flavor—it's worth the extra few bucks for this recipe.
No vanilla extract? Vanilla bean paste works in a pinch (use half the amount), or vanilla sugar at a 1:1 swap. The oats in the streusel? Gluten-free oats work perfectly if needed. For the apples, if you can't find Honeycrisp, Fuji or Gala are solid backups. The brown sugar in the filling keeps it moist—don't substitute white sugar here. And that powdered sugar? Use the sifter for cloud-like dusting. Pro tip: Toast the walnuts in a dry pan for 3-4 minutes—they'll smell amazing and add depth to every bite.
This cake stays moist for 5 days if stored in an airtight container at room temperature, or 2 weeks in the fridge. The streusel topping actually improves overnight, so if you're prepping ahead, do it the day before. For serving, I like to dust with powdered sugar right before slicing—warm the powdered sugar in a dry pan for 30 seconds first for a professional touch. Leftovers freeze beautifully for 3 months—just thaw at room temperature before serving.
Why You'll Love This Recipe
- No Fuss Layers: I swear by this recipe because it’s basically foolproof—just mix the dry ingredients (flour, sugar), cream the butter and vanilla, fold in eggs, and bake. The apples go in raw, so no peeling or slicing stress. Honestly, the hardest part is waiting for it to cool.
- Buttery Apple Magic: That rich butter in the batter? It melts into the apples, making every bite taste like a warm hug. The vanilla ties it all together—simple, but ridiculously good. My kids fight over the last slice, and I don’t blame them.
- Party or Snack: This cake is my secret weapon for potlucks, but it’s also perfect for a quick breakfast or after-school treat. Slice it thin, and it’s a fancy dessert. Leave it thick, and it’s a hearty snack. No rules—just flexibility.
- Leftovers? Yes, Please: The cake keeps well for days (if it lasts that long), and the flavor only gets better as the apples soften. I freeze slices for lazy mornings or pack them in lunches—no one ever complains. Budget-friendly? Absolutely. Delicious? Even more so.
Step-by-step instructions for apple crown cake
Here's how to bake layers of spiced apple goodness with a buttery streusel crown.
👨🍳 Step 1: Prepare the Apple Filling and Sift Dry Ingredients
Peel, core, and slice the 6 medium apples into ¼-inch thick rounds. Toss them with 2 tablespoons lemon juice in a bowl and set aside—this prevents browning and adds brightness. In a separate bowl, sift together the 3 cups all-purpose flour, 2 teaspoons baking powder, 1.5 teaspoons ground cinnamon, and 0.5 teaspoon salt. I like to sift twice for a light, airy texture that's perfect for cake layers.
Toast the 0.5 cup chopped walnuts in a dry skillet over medium heat for 3-4 minutes until fragrant and golden. Let them cool slightly before adding to your streusel mixture later. The reason for toasting? It deepens the nutty flavor and prevents them from tasting raw in the final cake.
🍳 Step 2: Make the Cake Batter and Streusel Topping
Cream the 1.5 cups unsalted butter and 2 cups granulated sugar together in a stand mixer until light and fluffy—about 3-4 minutes. Add the 4 whole large eggs, one at a time, mixing well after each addition. Scrape down the sides of the bowl as needed to ensure everything incorporates evenly. Here's the thing—room temperature ingredients mix better, so if your eggs or butter aren't quite there, let them sit at room temperature for 15 minutes before starting.
In a separate bowl, combine the 1.5 cups old-fashioned oats, 1 cup packed brown sugar, and toasted walnuts. This is your streusel topping—it should look like coarse crumbs with a few whole oats still visible. Mix in 2 teaspoons vanilla extract with the wet ingredients, then gradually add the sifted dry ingredients in 3 additions, mixing just until combined. Overmixing develops gluten, which makes the cake dense instead of tender.
🔥 Step 3: Bake the Cake Layers and Apple Filling
Preheat your oven to 350°F and grease three 8-inch round cake pans (or use parchment rounds). Divide the batter evenly among the pans, spreading it into the corners. Bake for 20-25 minutes until a toothpick inserted in the center comes out clean. Let the layers cool in the pans for 10 minutes, then transfer to a wire rack to cool completely.
While the cake layers bake, spread the prepared apple slices evenly on a parchment-lined baking sheet. Sprinkle with 0.25 cup powdered sugar and bake at 350°F for 15-20 minutes until tender but not mushy. The apples should hold their shape when pressed gently. Here's my trick: If they're browning too quickly, tent the sheet with foil to prevent over-browning while keeping them tender.
🥘 Step 4: Assemble the Crown Cake
Once all layers are completely cool, level the tops if needed with a serrated knife. Spread a thin layer of vanilla buttercream (made from the remaining 1.5 cups unsalted butter and 2 cups granulated sugar whipped with 2 teaspoons vanilla extract) on the first layer. Add half of the apple slices, then another layer of buttercream, followed by the remaining apple slices. Repeat with the final cake layer and top with the remaining buttercream.
For the crown, mix the streusel topping with enough of the remaining buttercream to hold it together. Spoon this mixture around the top edge of the cake, pressing gently to create a rustic crown effect. Chill the cake in the refrigerator for at least 2 hours before slicing. This ensures clean layers and prevents the cake from falling apart when you cut into it.
🍽️ Step 5: Serve with Confidence
Remove the cake from the fridge 15 minutes before serving to let it soften slightly. Dust the top with an additional sprinkle of powdered sugar and serve slices warm or at room temperature. The contrast of warm spiced apples, tender cake layers, and buttery streusel crown makes every bite a perfect balance of textures and flavors.
Real talk: This cake tastes even better the next day, so if you have leftovers, store them in an airtight container at room temperature. The flavors meld and intensify overnight—trust me, it's worth the wait!
Pro Tips For Making Apple Crown Cake
- Cream Butter Slowly: DESCRIPTION:
- Whisk Eggs First: DESCRIPTION:
- Don’t Overmix Dry Ingredients: DESCRIPTION:
- Chill the Batter: DESCRIPTION:
Essential equipment for great apple crown cake
Cake Pans Essentials
You'll need three 8-inch round cake pans for this recipe—I recommend Wilton Perfect Results pans for their even baking and easy release. These pans have a non-stick coating that prevents sticking, so you won't need to grease them heavily. If you don't have round pans, square 8x8-inch pans work too, though the presentation will differ. For a rustic look, try ceramic or cast iron pans—they create a beautiful contrast with the golden streusel crown. 🍰
Mixing Tools
A stand mixer with a paddle attachment is my go-to for creaming butter and sugar—it ensures light, fluffy results. If you don't have one, a hand mixer works fine, though it requires more elbow grease. For the dry ingredients, a fine-mesh sieve is essential to prevent lumps in your cake batter. I also recommend a spatula for scraping down the sides of your mixing bowl during the creaming process. Pro tip: Use a bench scraper to divide the batter evenly among your pans.
Apple Prep Tools
Peeling and slicing 6 medium apples efficiently requires a peeler and a sharp chef's knife—I prefer a Wüsthof for precision. A mandoline speeds up the process if you're comfortable using it, but it's not mandatory. For the lemon juice, a reamer or zester helps extract fresh juice quickly. Don't skip the lemon juice—it brightens the apples and prevents browning. A baking sheet with parchment paper is also key for baking the apple slices evenly. 🍎
Streusel & Assembly
Toast the walnuts in a 10-inch skillet over medium heat—this adds depth to the streusel. For mixing the streusel, a spoon or fork works, but a small bowl keeps everything contained. The serrated knife comes into play again when leveling the cake layers before assembly. A piping bag with a large tip makes it easy to create a neat crown effect with the streusel mixture. For chilling, a large baking sheet works, but I prefer a wire rack in the fridge to ensure even cooling.
Optional Upgrades
If you're feeling fancy, invest in a cake turntable for smooth frosting and assembly. A digital kitchen scale ensures precise measurements, especially for the buttercream. For presentation, a dusting brush makes powdered sugar application effortless. And if you love baking, a cake stand elevates your masterpiece for serving. These tools aren't essential, but they make the process smoother and the results even more impressive. ✨
Nutrition facts
Frequently asked questions
Can I make this apple crown cake without a stand mixer?
While a stand mixer makes creaming butter and sugar easier, you can achieve great results with a hand mixer or even by using a sturdy wooden spoon. Just be prepared to mix vigorously for about 5-7 minutes to get that light, fluffy texture. The key is room temperature ingredients—let your butter sit out for 30 minutes and eggs for 15 minutes before mixing.
What's the best way to store leftovers?
Store your apple crown cake in an airtight container at room temperature for up to 5 days. For longer storage, refrigerate for 2 weeks or freeze for 3 months. The cake actually tastes better the next day as the flavors meld! If freezing, wrap each layer individually in plastic wrap before stacking to prevent sogginess.
Can I substitute the apples with something else?
While apples are traditional, you can experiment with peaches or pears for a similar texture. For a tropical twist, try mango or pineapple (reduce lemon juice to 1 tablespoon). Just ensure your fruit is firm and holds its shape when baked. The filling should still be tender but not mushy—adjust baking time as needed.
Why does my streusel topping turn out crumbly instead of sticky?
This usually happens when the buttercream isn't properly mixed into the streusel or the streusel itself is too dry. Add a little extra buttercream (about 1-2 tablespoons) to bind the streusel. Also, make sure your oats are old-fashioned (not quick oats) and toast them lightly for better texture. Chill the cake for 2 hours before slicing to help the streusel set.
How do I make this cake gluten-free?
Replace the all-purpose flour with a 1:1 gluten-free baking flour blend (like Bob's Red Mill) and add 1 teaspoon xanthan gum to the dry ingredients. For the streusel, use gluten-free oats and ensure your brown sugar is labeled gluten-free. The cake may be slightly denser, but it will still hold together beautifully!