
Breakfast & Brunch
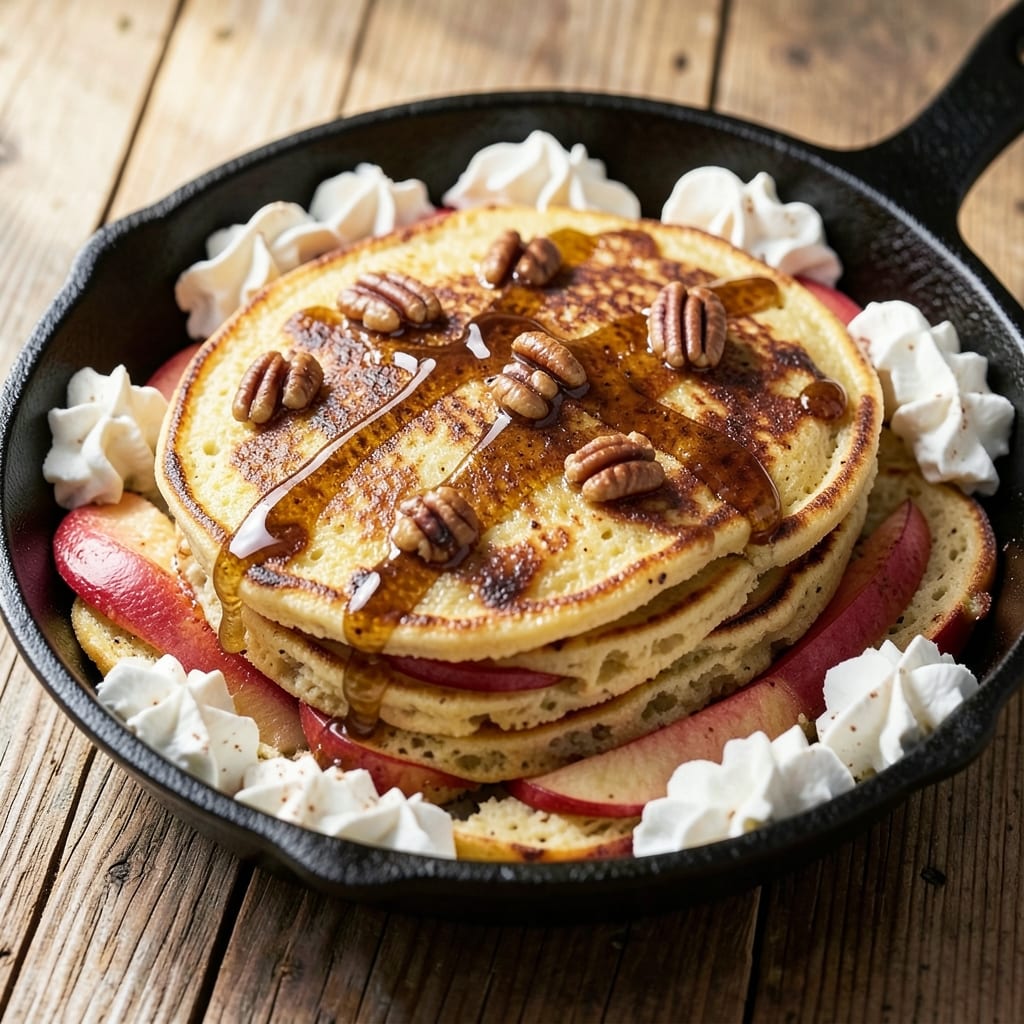
This apple pancake skillet recipe transforms breakfast into a comforting, caramelized masterpiece with every bite. 🍏 The secret lies in combining fluffy pancake batter with tender apples and warm spices, all cooked together in one cast-iron skillet for a harmonious blend of textures and flavors. I developed this method to capture the essence of a cozy brunch—where crispy edges meet soft centers, and the aroma of cinnamon and apples fills your kitchen.
The beauty of this dish is its simplicity: just five core ingredients create a restaurant-worthy meal without requiring advanced techniques. The batter cooks up light and airy while the apples soften into a perfect caramelized sweetness, their juices infusing the pancakes with natural flavor. Warm spices like cinnamon and nutmeg deepen the taste, making each bite feel like a hug on a chilly morning.
What you’ll end up with is a golden skillet of crisp-edged pancakes studded with tender apple pieces, their edges slightly caramelized from the apples’ juices. The texture is a perfect balance—crispy around the edges, tender in the center, with a subtle crunch from the apples that keeps every bite exciting. This dish serves as both a satisfying breakfast and a comforting dessert, depending on when you crave it.
Top with a drizzle of maple syrup, a sprinkle of powdered sugar, or a dollop of whipped cream to elevate it further. The skillet method ensures everything stays warm and cohesive, making it ideal for serving family or guests. Ready in under 30 minutes, this recipe proves that homemade can be both effortless and extraordinary.
Ingredients for apple pancake skillet
Five core ingredients create this cozy skillet masterpiece with crispy edges and tender apple centers.
| Ingredient | Amount | Notes |
|---|---|---|
| All-Purpose Flour 🌾 | 1 ½ cups | Sifted for fluffy batter |
| Granulated Sugar 🍚 | ½ cup | White or brown preferred |
| Baking Powder 🧂 | 2 tsp | Aluminum-free for best rise |
| Salt 🧂 | ½ tsp | Fine sea salt preferred |
| Large Eggs 🥚 | 2 whole | Room temperature for best mixing |
| Milk 🥛 | 1 ¼ cups | Whole milk for richness |
| Unsalted Butter 🧈 | ½ cup | Melted, cooled slightly |
| Granny Smith Apples 🍏 | 2 medium | Peeled, diced into 1/4-inch pieces |
| Ground Cinnamon 🌿 | 2 tsp | Freshly ground for best flavor |
| Ground Nutmeg 🌿 | ½ tsp | Freshly grated preferred |
| Pure Maple Syrup 🍯 | ¼ cup | For serving, grade A preferred |
| Powdered Sugar 🍚 | ¼ cup | For dusting, confectioners sugar |
The apples are the star here—Granny Smith for tartness, but any firm apple works. Peeled and diced evenly ensures consistent cooking. Most grocery stores carry Granny Smiths year-round, but check the produce section for the firmest ones. If you can't find Granny Smith, Honeycrisp or Fuji are solid backups. Avoid mealy apples like Gala—they turn to mush in the skillet. For a shortcut, pre-dice them while you're shopping and store in a sealed container for up to 3 days.
No baking powder? Baking soda plus 1 tsp cream of tartar works in a pinch. Whole milk can be swapped for oat or almond milk, but the batter may be slightly less tender. The cinnamon and nutmeg are non-negotiable for that warm spice profile—Penzeys or McCormick are reliable brands. For extra richness, swap half the milk for heavy cream. The butter should be melted but not hot—just enough to coat the back of a spoon. If you're in a rush, microwave it for 40 seconds then let it cool slightly.
This skillet reheats beautifully—just pop it in the oven at 350°F for 5-10 minutes. The pancakes are best served immediately, but leftovers keep for 2 days in the fridge. For make-ahead prep, assemble the batter and diced apples in advance, then cook fresh. The maple syrup and powdered sugar can be stored indefinitely—Trader Joe's has great bulk options. Freeze any extras in single portions for quick breakfasts later.
Why You'll Love This Recipe
- Skillet in Minutes: I swear, this takes less time than waiting for coffee to brew. Mix the dry ingredients—flour, sugar, baking powder, salt—then stir in eggs and diced apples while the pan heats. No measuring cups cluttering your counter, no separate batter bowl.
- Sweet Crunch Balance: That caramelized apple edge on the pancakes? Chef’s kiss. The sugar in the batter soaks into the fruit while cooking, giving you tender flakes with just enough bite—like biting into a cinnamon roll but with pancake structure. (Yes, even on a Tuesday night.)
- Weekday Breakfast Hack: Between us, this is my go-to when I’m running late or need something hearty for lunch. Make a big batch on Sunday, reheat slices in the toaster, and suddenly you’ve got a crowd-pleaser for school lunches or a quick office snack. No one will guess it’s just flour, sugar, and apples.
- Budget Brunch Winner: Honestly, you’re using pantry staples here—no fancy ingredients to break the bank. A single apple stretches across multiple servings, and the eggs add protein without costing extra. It’s the kind of recipe that makes you feel fancy while keeping your wallet happy.
Step-by-step instructions for apple pancake skillet
Master this one-pan wonder with perfectly balanced pancakes and caramelized apples.
👨🍳 Step 1: Prepare the Apple Filling
Peel and dice the 2 medium Granny Smith apples into ¼-inch pieces—uniform size ensures even cooking. Toss them in a bowl with 2 teaspoons ground cinnamon, ½ teaspoon ground nutmeg, and 1 tablespoon granulated sugar from the ingredients. Let the mixture sit for 5 minutes while you prepare the batter—this jumpstarts the caramelization process.
Here's the thing—Granny Smiths stay firm when cooked, so they hold up beautifully in the pancakes. If your apples are particularly juicy, drain them briefly in a colander to prevent a soggy filling. The spices should cling to the apple pieces, creating aromatic pockets of flavor throughout each bite.
🍳 Step 2: Mix the Pancake Batter
In a large mixing bowl, whisk together the 1.5 cups all-purpose flour, ½ cup granulated sugar, 2 teaspoons baking powder, and ½ teaspoon salt. I always sift the flour first—this prevents lumps and gives you a lighter pancake texture. Make a well in the center and add the 2 whole large eggs and 1.25 cups milk, mixing just until combined (a few lumps are fine).
Next, melt the ½ cup unsalted butter in a microwave-safe bowl for 30 seconds, then let it cool slightly. Stir this into the batter along with the prepped apple mixture. The warm butter helps emulsify the batter while the apple pieces distribute evenly. Don't overmix—just fold until everything is incorporated. The batter should be thick but pourable.
🔥 Step 3: Cook in a Preheated Skillet
Heat an 8-inch cast-iron skillet over medium heat until hot (about 350°F). Add the batter and spread it evenly into a ½-inch thick circle. Cook for 3-4 minutes until the edges look set and bubbles form on top. This is where patience pays off—don't rush the cooking or the pancake won't hold together.
Here's my pro tip: If the top browns too quickly before the edges are done, tent the skillet loosely with foil. The goal is golden brown edges with a slightly puffed center. You'll know it's ready when the pancake releases easily from the sides (use a thin spatula to check).
🥘 Step 4: Finish with Maple Syrup and Powdered Sugar
Once the pancake is cooked through (about 5-6 minutes total), remove from heat and let it rest for 1 minute. Drizzle ¼ cup pure maple syrup evenly over the surface and sprinkle with ¼ cup powdered sugar. Watch as the syrup melts into the warm pancake, creating a glossy finish that caramelizes slightly at the edges.
For that restaurant-quality touch, I like to fold the pancake into quarters at the table—this creates a neat presentation while keeping everything warm. Serve immediately with extra maple syrup on the side if desired. The contrast of warm spiced apples, fluffy pancake, and sweet syrup makes this skillet dessert perfect for brunch or a cozy weekend treat.
Pro Tips For Making Apple Pancake Skillet
- Use Cold Butter: I learned this the hard way—adding softened butter to the batter makes the pancakes greasy instead of flaky. Cut that butter into tiny cubes and mix it in last, right before cooking, so it melts into golden pockets as the pancakes cook.
- Slice Apples Thin: Thick apple chunks turn mushy and water down your batter. Aim for ⅛-inch slices—thin enough to soften but not disappear—and toss them in a little lemon juice while you prep. (Yes, even if you're impatient like me, give them 5 minutes to sit.)
- Wait for Bubbles: The second batch of pancakes always feels like a gamble, but resist the urge to flip them too soon. Wait until the edges look set and you see steady bubbles forming across the top—usually 2-3 minutes in a hot skillet. Flipping too early is how you end up with a pancake tower instead of a stack.
- Skip the Overmixing: This isn’t the prettiest method, but it’s the tastiest: stir the batter just until the dry ingredients disappear. Lumps are fine—overworking it makes the pancakes dense. A few tiny streaks of flour? Doesn’t matter. The apples will keep things tender.
Essential equipment for this recipe
Cast-Iron Skillet
This is my non-negotiable tool for this recipe—an 8-inch cast-iron skillet is essential for even heat distribution and that perfect crispy edge. I recommend a Lodge Pre-Seasoned Cast Iron skillet for its excellent heat retention and natural non-stick properties after proper seasoning. The thick base prevents hot spots, ensuring your pancake cooks evenly. If you don't have cast iron, a well-seasoned stainless steel skillet works in a pinch, but monitor the heat more closely to avoid sticking. 🔥
Mixing Bowls
Use a large mixing bowl (at least 3-quart capacity) for combining your dry ingredients and wet ingredients separately. I prefer stainless steel bowls because they're durable and easy to clean, but any non-reactive bowl works. For the apple mixture, a smaller bowl (about 1-quart) is perfect for tossing the apples with spices. The key is having separate bowls to prevent cross-contamination of your dry and wet ingredients.
Measuring Tools
Precision matters in baking, so invest in quality measuring tools. I use a stainless steel measuring cup set for the flour, sugar, and milk, and a digital kitchen scale for more accurate measurements of the flour and sugar. For the spices, a small spice scoop or measuring spoon set ensures you get the exact 2 teaspoons of cinnamon and ½ teaspoon of nutmeg without overdoing it. A fine-mesh strainer also comes in handy for sifting the flour to avoid lumps in your batter.
Spatula and Tongs
A thin, flexible silicone spatula is perfect for spreading the batter evenly in your skillet and checking for doneness. I also keep a pair of tongs nearby to help flip the pancake if needed—though this recipe is designed to cook in one piece. The silicone spatula won't scratch your cast iron and makes it easy to scrape up any stray batter or apple pieces. For serving, a long-handled serving spatula helps transfer the pancake directly to plates without breaking it apart.
Optional: Maple Syrup Dispenser
While a simple small pitcher works fine for drizzling maple syrup, I love using a glass syrup dispenser with a spout for a more elegant presentation. It also makes it easier to control the amount of syrup you're adding. For powdered sugar, a fine-mesh sieve ensures an even dusting without clumps. These small tools elevate the dish from homemade to restaurant-worthy with minimal effort. A small whisk also comes in handy for combining your dry ingredients smoothly before adding the wet ones.
Nutrition facts
Frequently asked questions
Can I make this recipe without a cast-iron skillet?
A well-seasoned non-stick skillet or even a heavy stainless steel pan will work, but monitor the heat carefully to prevent sticking. Cast iron distributes heat evenly, which is key for that perfect crispy edge. If using non-stick, reduce heat to medium-low to avoid burning the edges before the center cooks through.
What's the best way to store leftovers?
Store leftovers in an airtight container in the fridge for up to 2 days. Reheat in the oven at 350°F for 5-10 minutes until warmed through. For longer storage, freeze portions wrapped tightly in plastic wrap for up to 1 month, though texture may change slightly.
Can I substitute apples with something else?
Yes! For a tropical twist, try diced pineapple or peaches (use 1 cup, drained well). For a savory version, swap apples for sautéed mushrooms and onions. The key is using ½ cup of liquid-equivalent fruit or veggie to maintain batter consistency.
Why did my pancake turn out dense?
Overmixing the batter is the most common cause—stop folding once the ingredients are just combined. Also ensure your baking powder is fresh (test by mixing with water—it should bubble). Using cold butter or eggs can also make pancakes dense. Let ingredients sit at room temperature for 10 minutes before mixing.
How do I make this gluten-free?
Replace the all-purpose flour with a 1:1 gluten-free baking flour blend like Bob's Red Mill. Add ½ teaspoon xanthan gum to help bind the batter. You may need to adjust liquid slightly—start with 1 cup milk and add more as needed for pourability.